
Crowded Kitchen
US
en
Followers
731.5kAverage Views
5.3kEngagement Rate
5.0%Performance
Related Profiles


Croque Monsieur Bites for Day 23 of our Recipe Advent Calendar! 🎄 If you’re a last minute planner like I am, these ham & cheese puff pastry bites are an easy appetizer that everyone loves! Or if your Christmas menu is already locked in, bookmark this recipe for New Years Eve 👇 Croque Monsieur Bites (makes 12) Béchamel sauce: 1 tablespoon unsalted butter 1 tablespoon all purpose flour 1/2 cup whole milk 2 teaspoons dijon mustard 1/8 teaspoon salt Pinch of nutmeg Pinch of black pepper Assembly: 12 ounces puff pastry, thawed in the refrigerator 1 cup diced ham 1/2 cup shredded gruyere cheese 1 cup shredded swiss cheese 1/4 cup shredded parmesan cheese 1 teaspoon finely chopped thyme Preheat oven to 400˚F and lightly spray a muffin tin with cooking spray. Roll out the puff pastry on a lightly floured surface into a 12x12-inch square. Cut the puff pastry into 12 rectangles. Place one piece of puff pastry in each muffin tin. Refrigerate while you make the béchamel. Heat the butter over medium heat in a small saucepan until it's foamy. Reduce heat to low and add the flour, whisking for one minute, until smooth. Slowly stream in the milk, whisking until no lumps remain. Whisk in the dijon, salt, nutmeg and pepper. Continue whisking over medium-low heat until the sauce thickens, about 3 minutes. The sauce should coat the back of a spoon. Let cool slightly. Spread 1 teaspoon of béchamel in the bottom of each puff pastry. Top with a thin layer of ham, then a layer of cheese. Spoon in another 1 teaspoon of béchamel, then another layer of ham and cheese. Sprinkle with fresh thyme. Bake for 22-24 minutes, until the cheese starts to brown and the puff pastry is golden brown around the edges. Let cool for 10 minutes before enjoying.
102.2k
2.89%

Fireside Cocktail for Day 22 of our Recipe Advent Calendar! 🎄🔥 This cocktail is smoky, sweet, slightly bitter, and perfect for sipping by the fireplace this winter! It’s very similar to an Italian Greyhound cocktail, but we use blood orange juice instead of grapefruit and add in a rosemary simple syrup. We also smoke the cocktail glass with rosemary, so it’s the perfect wintery variation! If you can’t find any blood oranges, try another type of orange (like cara cara) or even grapefruit. If you would prefer a less smoky cocktail, just skip the smoking part! Makes 1 cocktail: 1 ounce vodka 1 ½ ounce Campari or Aperol 3 ounces blood orange juice ½ ounce rosemary simple syrup (recipe below) 1 small sprig rosemary for smoking the glass Rosemary Simple Syrup: 1 cup water 1 cup sugar ¼ cup fresh rosemary sprigs Simple syrup: Add the water, sugar and rosemary to a small saucepan over medium heat. Bring it to a simmer for 3-5 minutes, stirring until the sugar is dissolved. Remove from heat and let steep for 30 minutes before straining out the rosemary. Let cool completely before using in this cocktail. Cocktail: For best results, chill your cocktail glass for 15 minutes before smoking. Place a small sprig of rosemary on a heat-safe plate. Light the rosemary with a lighter, then place the glass over the rosemary to capture the smoke for 1 minute. Fill glass with a few large ice cubes. Pour in the vodka, Campari, blood orange juice and rosemary simple syrup and stir to combine. Garnish with rosemary and enjoy! #cocktail #christmas
17.2k
2.97%

Florentine Cannoli for Day 21 of our Recipe Advent Calendar! 🎄 Full recipe linked in our profile A few days ago, we were testing a batch of Florentines (aka lace cookies) when we realized that they work surprisingly well as cannoli shells! If you’ve never had a Florentine or lace cookie, they’re super thin, crispy, caramel-flavored cookies that often contain chopped nuts. We like to make ours with honey, and for this recipe, we leave out the nuts so that they’re very flexible and easy to work with! RECIPE (makes ~30) Florentines: 4 tablespoons (¼ cup) unsalted butter ¼ cup light brown sugar 3 tablespoons honey ¼ cup all purpose flour ¼ teaspoon salt ½ teaspoon vanilla extract Cannoli Filling: 2 cups ricotta, drained to remove as much moisture as possible 1 cup powdered sugar 1 teaspoon vanilla extract 1 teaspoon orange zest (optional) ⅓ cup mini chocolate chips For serving: mini chocolate chips and finely chopped pistachios Drain the ricotta: Lay out 2 pieces of paper towel on a flat surface. Spread the ricotta in a thin layer on top of the paper towel. Top with more paper towel and press down until it feels wet. Let sit for 30 minutes, replacing the paper towel once halfway through. This will remove as much moisture as possible from the ricotta so the cannoli filling is the proper consistency. Make the florentines: Preheat oven to 375˚F and line two sheet pans with parchment paper. In a small saucepan over medium heat, whisk together the butter, brown sugar and honey until melted. Remove from heat and whisk in the flour, salt and vanilla until no lumps remain. Optional: Let the dough cool so it's easier to work with (we place ours in the freezer for 20 minutes). Each dollop of batter should be a heaping ½ teaspoon (~¾ teaspoon). Place the dollops of batter on the sheet pan, making sure to leave at least 3 inches of space between each cookie. (These spread a LOT!) Bake for 6-8 minutes, until golden brown. Remove from oven and carefully transfer the parchment paper + cookies to a cooling rack right away (we slide it off the pan to the cooling rack). Let the florentines cool for about 30 seconds just until they are cool enough to handle. Using the handle of a spatula or whisk (ours has a ¾-inch circumference), carefully wrap the florentine around the handle so the circle overlaps. It will harden pretty quickly. Repeat with remaining florentines – if they start to solidify too quickly, pop them back in the oven for 15 seconds to make them pliable again. Make the ricotta filling: In a mixing bowl, mix together the drained ricotta, powdered sugar, vanilla, orange zest and mini chocolate chips until well combined. Using a round piping tip, pipe the ricotta mixture into the florentine shells. Fill one side halfway, then flip and fill the other side. Optional: dip each end in more mini chocolate chips or chopped pistachios. Enjoy! #cannoli #baking
2.5m
7.37%

Roasted Garlic & Herb Butter Fan Rolls for Day 20 of our Recipe Advent Calendar! 🎄 Full recipe linked in our profile Makes 12 Fan Rolls: ¾ cup whole milk ½ cup granulated sugar 1 envelope (7 grams) instant yeast 1 whole egg + 1 egg yolk 8 tablespoons unsalted butter, melted and slightly cooled 3 ½ cups all purpose flour 2 teaspoons kosher salt Garlic Herb Butter: 1 head of garlic 2 tablespoons finely chopped chives 4 tablespoons unsalted butter, melted Preheat oven to 400˚F. In a small saucepan, heat milk and sugar to 110-115˚F. Make sure it's not hotter than 120˚F, then sprinkle the yeast over the top and let sit for about 10 minutes, until the yeast is foamy. Add the eggs and melted butter to the bowl of a stand mixer and whisk for a few seconds. Add in the milk/yeast mixture, the salt and the flour. Mix together with a spatula until it forms a shaggy dough, then use the dough hook and turn your mixer to medium-high speed. Knead for about 5 minutes, until the dough is mostly smooth and bounces back when you press on it. Shape the dough into a ball, place in a greased bowl, cover and let rise in a warm place for 90 minutes, until the dough is doubled in size. Meanwhile, slice the top off your head of garlic to expose the cloves and wrap tightly in aluminum foil. Roast the garlic for one hour, until the cloves are golden brown and very soft. When the garlic is done roasting, let cool slightly, then squeeze all of the garlic out of the cloves into a bowl and mash with a fork. In a bowl, whisk together the melted butter, roasted garlic and chives and set aside. Remove the dough from the bowl and punch it down. Divide the dough into 2 equal-sized pieces. Roll out half of the dough into a rectangle about 16 x 13 inches. Trim the edges of the dough into perfectly straight lines to form a 15 x 12 inch rectangle. Cut the dough into 6 2.5-inch strips (cut on the long, 15" side) using a pizza cutter or knife. Leave one strip of dough untouched, then brush the other 5 strips with the garlic butter. You don't need much – just enough to coat the strip of dough in a thin layer all the way to the edges. Stack the strips of dough, placing the plain strip on top. Cut into 2-inch rectangles with a sharp knife. Make sure to cut straight through the dough so you don't compress the layers. Repeat with the other half of the dough to make 12 total rolls. Place each fan roll in a greased muffin tin, cut side facing up. Cover and let rise in a warm place for 1 hour-90 minutes. Meanwhile, preheat oven to 350˚F. Once the rolls are done rising, transfer to the oven and bake for 16-18 minutes, until they start to turn golden brown on top. As soon as the rolls come out of the oven, brush with more garlic chive butter (you will have to melt the butter again in the microwave before doing this). Let cool slightly, then enjoy! #rolls #baking
71.0k
6.22%

Jingle Juice Punch for Day 19 of our Recipe Advent Calendar! #Ad21+ This is the easiest batch cocktail to make for a big group. #DrinkResponsibly If you’re hosting for the holidays and need a super quick, easy cocktail that will serve a large group, this punch is the way to go! If you want to make a nonalcoholic version, leave out the alcohol and add in ginger beer and/or club soda instead. Jingle Juice Punch (serves ~12-14) 5 cups SIMPLY CRANBERRY juice 3 cups SIMPLY APPLE juice 1 cup SIMPLY orange juice Vodka Orange liqueur Sparkling rosé For garnish: mandarin or orange slices, cranberries, (optional) star fruit Add everything except for the rosé to a large bowl or dispenser. Refrigerate until ready to serve. Add in ice and top off with sparkling rosé, then stir gently. Ladle into glasses and enjoy! #simplypartner
26.4k
2.65%

Balsamic Shallot Tarte Tatin for Day 18 of our Recipe Advent Calendar! Recipe linked in our profile
237.3k
6.9%

Carrot & Roasted Red Pepper Feta Dip for Day 17 of our Recipe Advent Calendar! 🎄 If you’re still looking for an easy, crowd-pleasing dip for your holiday appetizer spread, look no further! This super creamy dip is packed with flavor and just the right amount of spice. Just roast the vegetables, then add everything to a blender and blend until smooth. We like to top ours with more olive oil, paprika, pomegranate arils and mint or parsley. Serve this dip with pita, naan, chips and/or fresh vegetables. It stores well in the fridge for up to a week, so you can make it ahead of time! Carrot & Roasted Red Pepper Feta Dip 2 red bell peppers, deseeded and sliced in half 3 large carrots, cut into 1-inch pieces 1 head of garlic Olive oil & salt to taste 1 15 oz can white beans 7 oz feta cheese ¼ cup freshly squeezed lemon juice 2 tablespoons olive oil 1 ½ tsp kosher salt 1 ½ teaspoons smoked paprika ½-¾ teaspoon red pepper flakes Preheat oven to 400˚F. Slice the top off of the head of garlic, exposing the cloves. Drizzle the garlic with some olive oil and salt, then wrap in aluminum foil. Place the garlic on a sheet pan with the red peppers (skin side up) and carrots. Drizzle more oil and salt on the peppers and carrots. Roast for about 30 minutes, until the carrots are fork tender. The garlic may need up to 45 minutes. Cover the peppers with aluminum foil for 10 minutes, then peel off the skin and discard. Add all ingredients to a blender or food processor and blend until completely smooth.
29.7k
3.66%
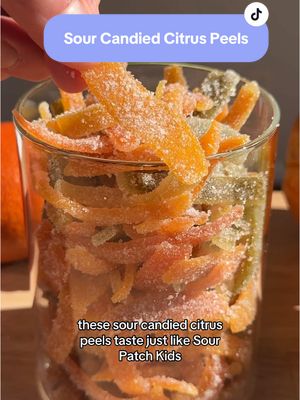
Sour Candied Citrus Peels (that taste like sour patch kids!!) are a great way to use up leftover citrus peels this winter! 🍊 RECIPE below 👇 and on our website! SOUR CANDIED CITRUS PEELS 8-9 citrus fruits (we used a mix of orange, lemon, grapefruit, blood orange and lime) 3 cups granulated sugar 2 1/4 cups water For coating: 1/2 cup granulated sugar + 1 tbsp citric acid (or more depending on how sour you like them) Cut off the top and bottom of each citrus. Score the peel vertically from top to bottom about 6-8 times, spacing the cuts apart equally. Remove the peels from the fruit, then use a paring knife to carefully remove as much of the white pith as possible. You can also use a vegetable peeler, but we have found that these often end up being a bit too thin and they will not be uniform in size. Cut the peels into 1/4-inch strips. Add all of the peels to a saucepan and cover with water. Bring to a boil and boil for 3-4 minutes, then drain. Return the peels to the pot, cover with water and bring to a boil again. Drain immediately after boiling (this vastly reduces the bitterness of the peels). Add sugar and water to the pot over medium-high and stir until sugar is dissolved. Bring to a simmer, then add in the citrus peels. Reduce heat to medium low and simmer for 50-60 minutes, stirring occasionally. Use a slotted spoon to transfer the peels to a wire baking rack. Space them apart so they aren’t overlapping much and let dry for about 30 minutes. Whisk together the sugar and citric acid. Taste and adjust citric acid as desired. Toss the peels until well coated and enjoy!
300.9k
5.09%

Jalapeño Popper Cheese Crisps + Marie’s Ranch for dipping = the ultimate 4-ingredient Super Bowl snack! #MariesPartner Save the full RECIPE below👇 These couldn’t be easier to make and they’re bound to be the biggest hit at your Super Bowl party!! Crispy, cheesy, spicy, and dipped in Marie’s creamy ranch dressing, which is absolutely delicious 😍 You can find it in the refrigerated produce section of your local store! Tip: buy cheddar in a block and shred it yourself – it will melt much better and crisp up faster/more evenly! Jalapeño Popper Cheese Crisps (makes ~32) 6 slices cooked bacon, chopped finely 8 oz sharp cheddar cheese 1 large or 2 small jalapeños, sliced thinly Marie’s Creamy Ranch Dressing for dipping Preheat oven to 375˚F. Finely shred the cheddar cheese. Using a heaping 1/2 tablespoon of shredded cheddar per crisp, place cheddar down on a nonstick sheet pan in little piles, leaving space in between (they will spread). Top with crumbled bacon, then place a jalapeño slice on top. Bake for 10-12 minutes, until the cheddar is a deep golden brown. Keep an eye on your oven – it may take more or less time depending on exactly how much cheese you used. Let cool on the sheet pan until set, then remove with a spatula. Enjoy dipped in Marie’s Ranch!
145.9k
0.73%

Sparkling Citrus Margarita (mocktail + cocktail versions below) paired with an easy Mango Avocado Salsa = my ideal simple, refreshing cocktail + app pairing for the big game in a few weeks!! 🏈🍹#QPartner 21+ Ever since I’ve been pregnant, I’ve been craving citrus NONSTOP, so this sparkling citrus margarita mocktail is my ideal drink right now, especially topped with Q CLUB SODA to make it extra fizzy and refreshing👌 Of course I’m also making a regular batch with tequila for the rest of the family, but it’s so nice to enjoy a drink that tastes just as delicious! High quality mixers always make the biggest difference, but especially in mocktails. We always recommend @Q Mixers for premium quality & ingredients, less sugar, and max carbonation! Q CLUB SODA stays bubbly for so much longer than other club sodas or seltzers because they start with maximum carbonation 😍 It also genuinely tastes better – they add a pinch of Himalayan salt to enhance subtle flavors! Stock up on Q for your Super Bowl party with 15% off their official Amazon store using our code 15KITCHENQ! #QItUp 🍊🍹COCKTAIL/MOCKTAIL RECIPE: (makes 1) 1.5 oz tequila (or spirit free alternative for mocktail version) 1/2 oz orange liqueur (leave out for mocktail) 3 oz freshly squeezed citrus juice (orange, mandarin, tangerine, blood orange) 1 oz lime juice 1/2 oz agave 1 1/2 oz Q CLUB SODA for topping Optional: Tajín for the rim Moisten the edge of your glass with a lime wedge, then dip in tajín or salt. Add tequila, orange liqueur, citrus juice, lime juice & agave to a cocktail shaker filled with ice. Shake well, then strain into the margarita glass with ice and top off with club soda. Cheers! 🥭🥑 TO MAKE THE SALSA: In a large bowl, combine 2 diced mango, 2 diced (ripe) avocados, 1 diced red bell pepper, 1 finely minced jalapeño, 1/3 cup finely diced red onion, 1/4 cup finely chopped cilantro, juice from 2 limes, and salt or tajín to taste. Toss until well combined, then enjoy with tortilla chips.
7.4k
3.98%

Dark Chocolate & Sea Salt Nut Bars (KIND bar copycat!) for episode 32 of Better Than Store-Bought! If you’re new here, this series is all about sharing homemade versions of our favorite store-bought snacks and meals. So far we’ve made homemade cheez-its, pop tarts, fruit snacks & so much more, so make sure to follow so you don’t miss any new recipes! These homemade KIND bars are SO easy to make with just a few ingredients, plus you can customize them with any nuts you already have in your pantry! We use brown rice syrup to sweeten/hold the bars together. It’s quite a bit thicker and even more sticky than honey, but once baked, it makes these bars super crisp with just the right amount of sweetness. We haven’t personally tried this recipe with honey – it should work, but the bars may be stickier. SAVE the RECIPE below 👇 and let us know what you want to see next in the comments! RECIPE: (makes 10-12) 2 ½ cups unsalted nuts of choice (we use ¾ cup cashews, ¾ cup peanuts and 1 cup almonds) ½ cup puffed rice ¼ cup brown rice syrup 1 ½ teaspoon vanilla extract ½ teaspoon sea salt 1 cup dark chocolate chips 2 teaspoons coconut oil Optional: flaky salt for topping Preheat oven to 325˚F. Spread the nuts into a single layer on a sheet pan and bake for 5-8 minutes. Line an 8x8" pan with parchment paper. In a large mixing bowl, combine the nuts and puffed rice. Microwave the brown rice syrup for 30 seconds. Whisk in the vanilla and salt, then pour over the nut mixture and stir until evenly coated. Transfer the nut mixture to the prepared pan and press into an even layer. Bake for 18-20 minutes. Remove from the oven and let cool for ~30 minutes, then slice into bars and let cool completely. Microwave the chocolate & coconut oil in 30 second intervals until fully melted. Dip the bottom of each bar into the melted chocolate, then transfer to a baking sheet lined with parchment paper. Drizzle the top of each bar with melted chocolate, then top with flaky salt. Store in a container at room temp for 1 week or freezer for a few months!
752.3k
3.82%

#ad Caesar salad in wrap form, but with shaved brussels sprouts for crunch and @MorningStar Farms crispy Chik’n for plant protein 🤩 #MorningStarFarmsPartner I crave caesar salad at least 3x a week, so these wraps are really my ideal lunch! We like to use super thinly shaved brussels sprouts instead of romaine so it’s more of a slaw, which is better suited for a wrap. So much crunch! We toss it in an easy, homemade (anchovy free) caesar dressing, parmesan, some croutons and diced MorningStar Farms crispy Chik’n patties! They're such an easy swap for regular chicken and they taste great. If one of your goals this year is to incorporate more plant protein into your diet, these patties have 9g protein per patty and they’re super easy to make in just a few minutes. Perfect for throwing together a quick vegetarian meal when you’re short on time! Save the RECIPE below and give it a try soon 👇 (makes 6 wraps) Salad: 1 lb brussels sprouts 1/4 cup shredded parmesan 1 cup croutons (I’ll pin our homemade recipe in the comments, but store-bought is fine too!) 4 MorningStar Farms Chik’n Patties 6 wraps Dressing (anchovy free): ½ cup mayonnaise 2 tbsp freshly squeezed lemon juice 1 ½ tsp Worcestershire sauce 2 large or 3 small garlic cloves, grated ¾ tsp dijon mustard ¾ tsp white vinegar ⅓ cup grated parmesan cheese ¼ tsp black pepper Pinch of salt Whisk together all dressing ingredients. To cook the patties, preheat air fryer to 400˚F. Place the frozen patties in the basket and cook for 7-9 minutes, flipping them over halfway through, until crispy. Let cool slightly, then dice. Trim the ends of the brussels sprouts and cut in half (this way, you don’t end up with any huge shreds). Using the shredder attachment on your food processor or a mandoline, shred your brussels sprouts into 1/16” shreds. Add the brussels sprouts, chik’n patties, croutons & parmesan to a large bowl and toss really well with the dressing until all shreds are evenly coated. Place filling in the middle of the wrap and fold the left and right edges over the middle. Fold the bottom edge over the filling and then tightly roll towards to top edge. Enjoy! Crouton recipe: 8 oz finely cubed sourdough or similar bread (3 cups cubed) 2 tbsp olive oil ½ tsp salt ½ tsp dried parsley ¼ tsp pepper ¼ tsp garlic powder Preheat oven to 375˚F. Slice bread into ¼” cubes. In a medium bowl, whisk together olive oil, salt, parsley, pepper, and garlic powder, then add in bread cubes and toss to coat. (It’s easiest to use your hands for this). Transfer to a sheet pan and bake for 17-20 minutes, stirring halfway, until light golden brown and toasted.
9.3k
4.64%
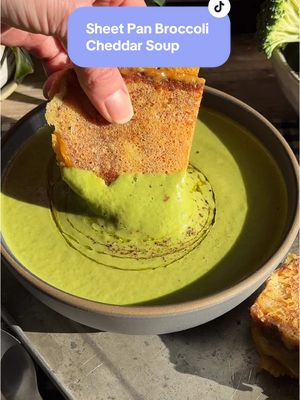
Sheet Pan Broccoli Cheddar Soup with Parmesan Crusted Grilled Cheese 😍🥦🧀 the ultimate cozy (and easy!) soup to try this week! RECIPE (4servings) 1 lb broccoli florets Half of a yellow onion, sliced into 1/2” wedges 1 head of garlic 2 tbsp olive oil 1 tsp mustard powder 1/2 tsp kosher salt 1/4 tsp tsp black pepper 1 tsp nutritional yeast Pinch of cayenne pepper 3 cups chicken or vegetable broth 1 1/2 cups baby spinach, packed 2 oz shredded cheddar cheese 1 oz shredded parmesan cheese Preheat oven to 350˚F. Slice the top off the garlic bulb to expose the cloves. Add broccoli, onion and garlic to a sheet pan. Drizzle with olive oil, then season the broccoli and onion with mustard powder, salt, pepper, nutritional yeast and cayenne. Toss to coat. Cover the sheet pan with foil and roast for 35-45 minutes, until the broccoli is fork tender and lightly browned. About 10 minutes before the vegetables are done, heat the broth in a small pot until it’s very hot. Right after they come out of the oven, add the roasted vegetables (we use half of the garlic cloves and save the other half for another recipe!), broth, spinach and both cheeses to a heat safe blender and blend until completely smooth. Enjoy warm! TO MAKE THE GRILLED CHEESE: Heat 1-2 tbsp of butter in a skillet. Toast two slices of bread in the pan until golden brown on one side. Flip the slices of bread over, then set one piece of bread aside. Grate parmesan cheese directly on the pan in an oval about the size of the piece of bread. Place the untoasted side of the bread on the parmesan. Top with 2-3 slices of cheddar cheese, then top with the other slice of bread. Cook until the parmesan side is golden brown, then grate another bed of parmesan next to the sandwich and flip the untoasted side onto the parmesan. Cook until golden brown and crispy. Enjoy with your soup! #soup #soupseason #sheetpan
17.5k
5.3%

Sugared Cranberries (and Rosemary) for day 24 of our Recipe Advent Calendar! 🎄 Merry Christmas Eve!! 🎅 If you’ve been here since December 1st, thank you SO much for all of your support and kind comments this month. Sugared cranberries: 1 cup water 1 ½ cups granulated sugar 16 ounces fresh cranberries ½ cup granulated sugar for coating Optional: A few sprigs of rosemary Add water and sugar to a saucepan and heat until the sugar is dissolved. Remove from heat and let cool for 5 minutes. Place the cranberries in a large bowl and pour the simple syrup on top. Stir well to coat the cranberries, and let them sit in the syrup for a few minutes. Line a sheet pan with a wire cooling rack. Using a slotted spoon, transfer the cranberries to the wire rack, spreading them apart so they aren't touching. Let them sit out at room temperature for at least one hour to dry. They should be very sticky. If making sugared rosemary, repeat the same process with the rosemary. You can save the simple syrup for use in cocktails. Add ½ cup of sugar to a wide bowl. Working a few cranberries at a time, coat the cranberries in sugar until evenly coated. (Follow the same process with the rosemary sprigs.) Let the sugared cranberries dry for another hour at room temperature. Keep these sugared cranberries stored at room temperature in a cool, dry environment for about 2 days, or in the refrigerator for 1 week. If the sugar starts to 'melt', just toss them in more sugar to re-coat.
16.2k
4.33%
start an influencer campaign that drives genuine engagement


Technology
Fastest Growing